Step 1 - Get Your Existing Ideas into a CSV Spreadsheet Format
If you have your ideas in another system, make sure to export them into a CSV file. If you have an existing spreadsheet where you're tracking ideas, make sure that spreadsheet is in a CSV format vs. the default XLSX format.
Tip - Make sure that your spreadsheet is in a CSV format. XLS or XLSX will not import correctly.
Step 2 - Review Your Spreadsheet and Determine Which Custom Fields You'll Need to Add in Ideawake
In Ideawake, we have several default fields that come built in, but there may be other columns in your spreadsheet you would like to import. Please review the default fields available in Ideawake and determine which fields you'll need to create in your Ideawake community before completing your import.
| Default Fields in Ideawake | Common Custom Fields You May Need to Create |
|
|
* Importing Submitters, Owners, and Team Members
If you would like to assign an idea submitter, owner, or team member, you must first invite them to your Ideawake community.
The problem? You will often want to have your ideas imported into Ideawake before inviting your company to participate in your Ideawake community.
The Solution - For a workaround, you can create custom fields named "Submitter," "Owner," and "Team Members" and import them into Ideawake. This will allow you to keep analytics on submitters while successfully importing your existing ideas before inviting users into your Ideawake community.
- Add a "Single Select" Custom Field named submitters
- Add the Name of one submitter in your custom field response options
- Click "Save"
Step 3 - Add Custom Fields in Ideawake So You Can Import Extra Columns in Your Spreadsheet
If you don't have any extra columns in your spreadsheet, you can skip step 3 and go straight to step 4.
Once you've identified which columns in your spreadsheet that you'll need to create, follow this tutorial to create your custom fields which will allow you to map your extra columns in your import so you don't end up losing any data.
For more information on the types of custom fields available in Ideawake, see Custom Field Types and Options.
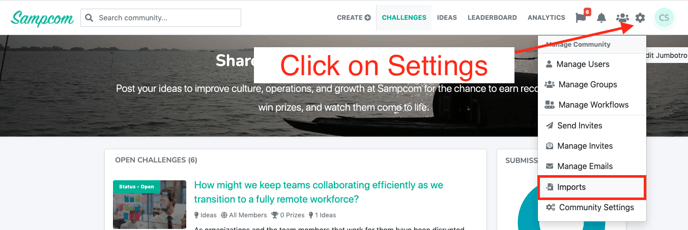
Step 4 - Go to the Imports Page
You will need to be logged in as a moderator or administrator to import.
Step 5 - Complete Your Import
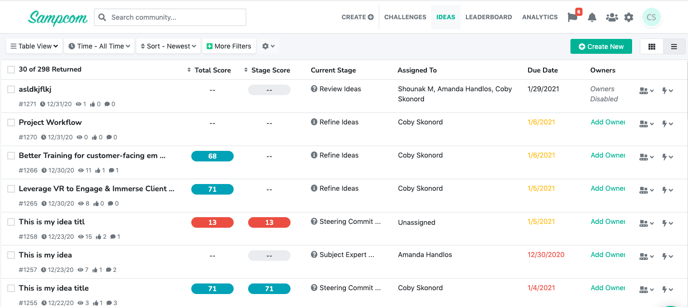
Step 6 - View the "Ideas" Tab to Confirm Your Import
Once you receive the success message saying that your ideas have been imported successfully, go to the ideas page to confirm that you can see your new ideas.