![ideawake-logo-simple-no-padding-1.png]](https://academy.ideawake.com/hs-fs/hubfs/ideawake-logo-simple-no-padding-1.png?height=30&name=ideawake-logo-simple-no-padding-1.png)
Send ideas from Ideawake straight into Jira. When an idea is posted, or when it reaches a stage you choose (for example Implementation), Ideawake automatically creates a Jira issue with the idea's title, description, link and any other fields you map. Your delivery team works in Jira, and nobody has to copy ideas over by hand.
Before you start
- You must be a Community Administrator in Ideawake.
- You need a Jira Software Cloud account that can create issues in the target Jira project. You'll connect it once through Atlassian's sign-in (OAuth).
- Know which Jira project, issue type and reporter you want new issues to use.
Step 1: Open the Jira integration
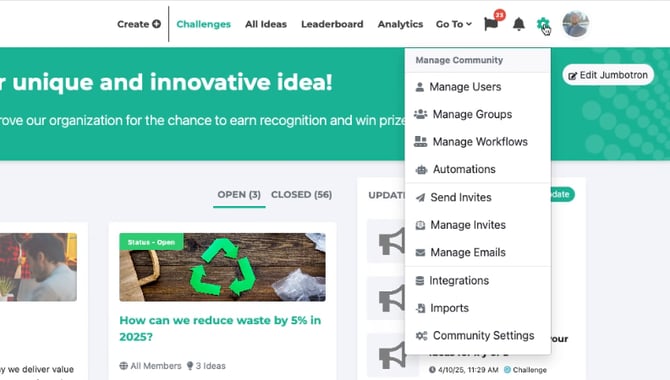
- Click the gear icon (Manage Community) in the top navigation.
- Select Integrations.
- Scroll down to Jira Software Cloud and click Manage integration.
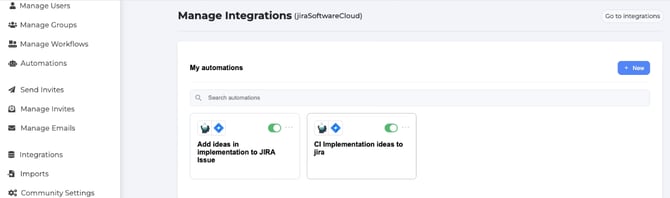
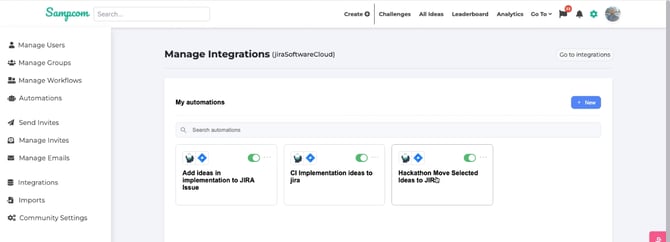
You'll see My automations, a list of any Jira automations already set up. Each one has an on/off toggle.
Step 2: Create and name a new automation
- Click + New.
- Enter a name in Give your automation a name, for example Move Implementation ideas to Jira.
Step 3: Choose the trigger
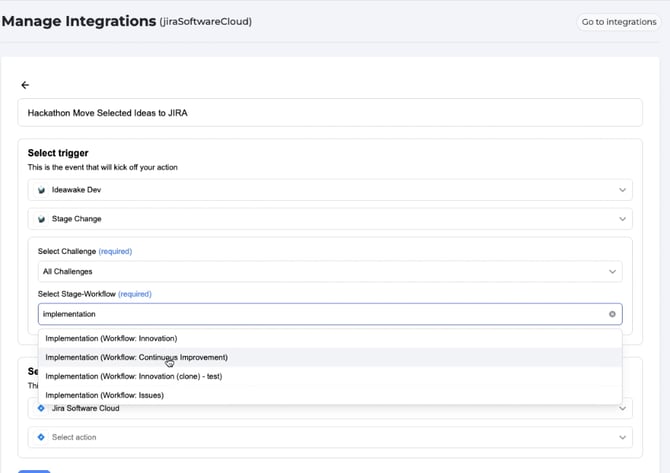
Under Select trigger, your community is pre-selected. Open Select trigger and pick one:
| Trigger | When it fires | Filters |
|---|---|---|
| New Idea | Every time a new post is submitted | Select Post Type, Select Challenge |
| Stage Change (most common) | When an idea moves into a specific stage | Select Challenge, Select Stage-Workflow |
For Stage Change, the defaults are All Challenges and All Stages (Workflow: All Workflows). Narrow it to the one stage you want. Type to search, for example "Implementation", then pick the right workflow from the list, such as Implementation (Workflow: Issues). Stage names repeat across workflows, so check the workflow name in brackets.
Step 4: Choose the action and connect Jira
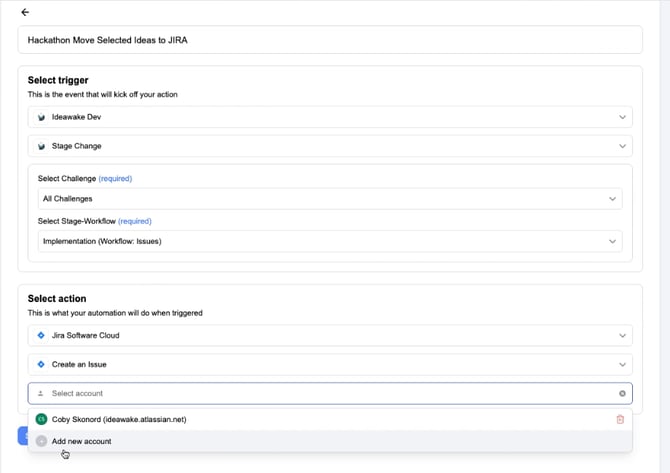
- Under Select action, Jira Software Cloud is pre-selected. Open Select action and choose Create an Issue.
- Open Select account. The first time, click Add new account and sign in with Atlassian to authorize Ideawake. After that, pick the connected account (shown as Name (yoursite.atlassian.net)).
Step 5: Set up the Jira issue
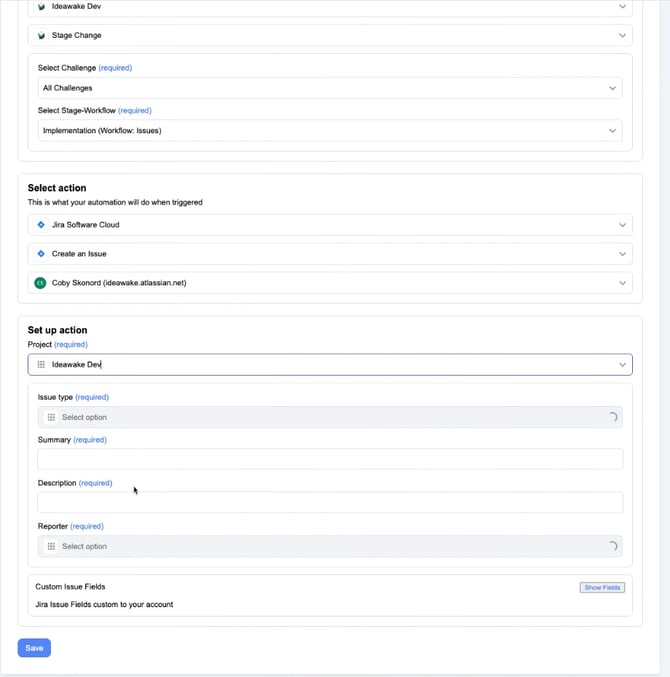
Under Set up action, fill in the required fields:
- Project: the Jira project the issue goes into.
- Issue type: for example Task, Story or Bug (the options come from your Jira project).
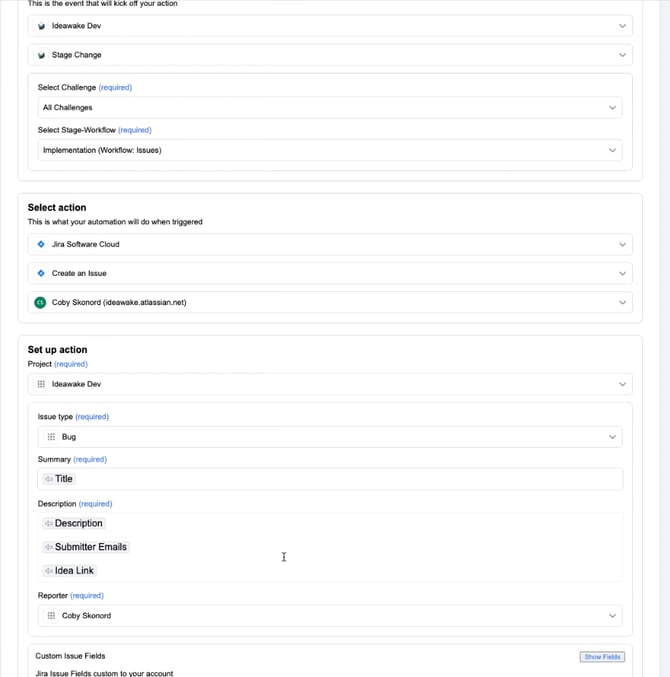
- Summary: usually the idea's Title.
- Description: whatever context your team needs. A common setup is Description, Submitter Emails and Idea Link, each on its own line.
- Reporter: a user who exists in your Jira site (see note below).
- Custom Issue Fields (optional): click Show Fields to map Jira fields that are custom to your account.
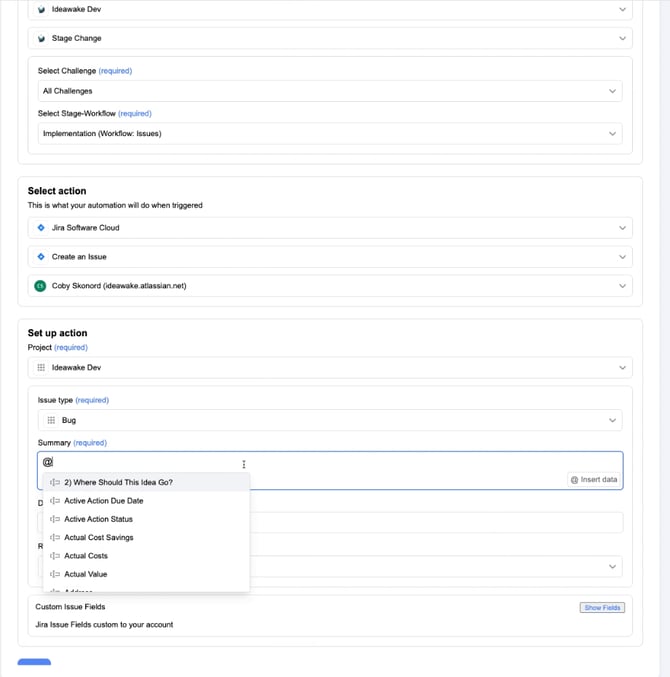
Inserting idea data: In Summary or Description, type @ or click @ Insert data, then search for a field. Available data includes:
- Idea basics: Title, Description, Idea Link, Opportunity Id, Community Id
- Challenge: Challenge Name, Challenge Link
- People: Submitter Names, Submitter Emails, Submitter Groups, Owner Names, Owner Emails, Team Member Names, Team Member Emails
- Workflow: Stage, Stage Status
- Any custom fields from your submission forms and stages (for example department, category or estimated savings)
About the Reporter field: Jira requires the reporter to be a user in your Jira site. Most teams pick one person, such as the program owner or the Jira project lead. Only map Submitter Emails as the reporter if your submitters also have Jira accounts, otherwise issue creation will fail.
Step 6: Save and test
- Click Save. You'll know it worked when you're redirected back to My automations and your new automation card appears with its toggle on.
- Test it: move a test idea into the stage you chose (or submit a new idea for a New Idea trigger), then check your Jira project for the new issue.
Managing your automations
- Use the toggle on an automation card to pause or resume it without deleting it.
- Use the … menu on the card to edit or remove it.
- You can create several automations, for example one per challenge or one per workflow, each sending ideas to a different Jira project.
Troubleshooting
| Problem | Likely cause and fix |
|---|---|
| Save does nothing / page doesn't redirect | The automation has no name. Add one in Step 2. |
| Too many Jira issues are being created | The trigger is set to All Stages or All Challenges. Narrow it to one stage. |
| No issue appears in Jira | Confirm the toggle is on, the idea entered the exact stage and workflow selected, and the Reporter is a valid Jira user. |
| Jira project or issue type is missing | The connected Atlassian account can't access that project. Reconnect with an account that can. |